A Candid Perspective: 7 basic tips for taking photos you love
laura_hubber · November 4, 2012

 My good friend Laura is posting today on photography! While Montana feels like home, she has found her way to Portland, OR where she juggles three jobs working for a winery, as a nanny and as an artist. In her “free” time she likes to blog, hike, laugh and reflect with friends over a cup of chai (her + coffee = scary), wear hats, adventure, cook, and find inspiration. She can be found blogging about waking up to a healthy, creative and balanced life at my morning moxie. 1. Get to Know Your Camera A great camera does not make a photographer good, but a good camera is the key tool in building a great photographer. Do not toss your owners manual aside. Learn what the letters and symbols mean. Experiment with your cameras settings. It is not a crime to use preset scenes or auto mode to shoot photos, but if you have an “M” on your camera dial that you’ve been ignoring, it might as well stand for “Missing out” rather than “Manual”. The more you know about your camera, the more well prepared you will be to take a beautiful photo.
2. Take Photos Sounds obvious, right? It is, however, the single most effective way to take more photos you love. I guess this is my way of saying practice makes perfect (or “practice makes progress”, as I prefer). I have learned this truth over the course of my life, but it has been since starting my photo blog, daily perspective, a few years ago, that I truly learned how beneficial it is to just go do something. (p.s. I am not endorsed by Nike) Honestly, I can’t say that I love all of the pictures I take, but I know that without getting out and taking more photos, I would not have 90% of the shots that I do love. So get out there. Challenge yourself to break out the camera more, pick a simple object and take ten different photos, start a photo blog(!?) or just go for a walk with your camera every now and then. It is up to you to take more photos. 3. Get Technical Exposure Gaining an understanding of exposure (enter “S”, “A” and “ISO”) is like getting into the mind of a photo and controlling it. The relationship between Shutter Speed, Aperture and ISO allows you to take the conditions you are given and create the photo exposure you desire. Shutter Speed refers to the amount of time a camera shutter stays open. It is measured in seconds, ranging from small fractions of a second (1/60) to several seconds (4) and even minutes in certain conditions. Aperture determines the amount of light that passes through the lens. It is measured by the size of the opening in the lens and referred to by an f number or f-stop. This all gets a little confusing and mathy and the numbers are weird, but the f number basically indicates the amount of light that is “stopped” from entering the lens. A smaller number (f/2.8) means a larger amount of light passes through where a larger f-stop (f/16) indicates a smaller aperture. ISO measures the cameras (or films) sensitivity to light. It is represented by doubling numbers normally ranging from 100 to 3200. The important thing to know is that the higher the ISO number is, the more sensitive your camera (or film) is to light. So, how does all this technical stuff translate to photos? Below is a six step process I took in finding a good exposure. The composition, focus settings and lighting are constant, but I change one exposure setting with each new picture. See if you can make sense of the changes and then read below for an explanation. 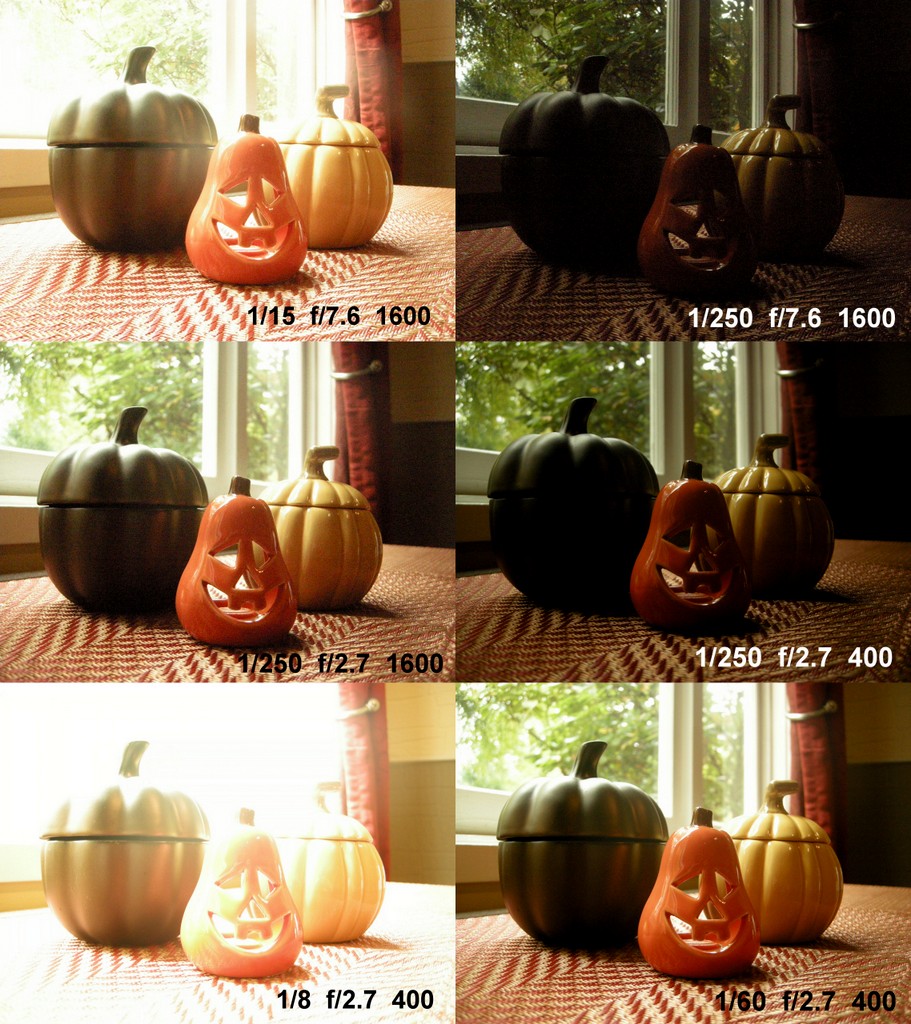 I almost nailed it on my first guess, but it is a little bit overexposed and not completely in focus. I decide to adjust the shutter speed. Oops…went too far! It is dark, but I like the focus, so I open up that aperture. The third shot is almost perfect, but I notice it is pretty grainy. This happens when the ISO is too high, so, I cut back on the sensitivity. Now it is too dark again, so I decide to slow down the shutter and let more light in that way. Oops again! That slower shutter let too much light in. All I need to do is find a good compromise on the shutter speed and finally the exposure is looking pretty good all around. The best way to fully gain an understanding of exposure is to follow the first two tips. Get to know your camera so that you can correct the exposure if needed and get out there and practice finding the balance between Shutter Speed, Aperture and ISO in a variety of scenarios. 4. Be Focused
 Whatever person, place or thing catches your attention deserves to be the “point of focus” in your photo. Once again, knowing your camera (and lenses) will help give you an upper hand in creating sharp images. Different cameras have different focus options ranging from auto-focus of varying types to pre-set close up and landscape settings to manual focus. Some cameras have all of these. Know what you are working with.
“Point of focus” is fairly simple to understand. Often your focal point will be specific, such as a person or flower. When shooting a landscape, on the other hand, you might want the mountain, the trees and the lake to be in focus. In this case, the focal point includes several points. Sometimes your camera has a way to make this easy, but eventually you will have to realize what a huge role exposure plays in the focus of your images. “Depth of field” basically refers to the amount of your photo that is in focus. The photo below has a fairly small or “shallow” depth of field because only a small portion is actually in focus.
 The larger the depth of field, the more of the picture that is focused. For a landscape photo, you want a larger depth of field. For a shot of a flower, you may want a more shallow depth of field. So what determines depth of field? The distance from the lens to the focal point and the angle of the lens both play a role. The other big player in depth of field is aperture. So, if you can’t adjust your focus mode, angle or distance from the focal point, but you are still not satisfied, try to adjust the aperture. The less you stop light from entering that lens (smaller f number/larger aperture), the more depth of field you will have. The smaller the aperture(larger f number), the smaller the depth of field.
Shutter speed, a low ISO and a tripod can also play major roles in producing clean and focused photos. Again, the best way to understand how to be focused is to get out and experiment with your camera.
5. Compose Carefully  The way the elements of a scene fill the frame of a photograph gives it life. Composition is at the heart of a picture. When you stand behind a lens, you have the power to choose what fills the frame. Remembering to do a few key things will lead to an effective composition: Think Aesthetically. Observe the sizes of the objects involved. Does something else in the frame take weight away from your focus? Look at the way the colors and light interact. Do they clash or are they interesting and/or harmonious? Consider the type of layout that makes your subject most interesting. Should it be centered or off center? Often, an off center composition is more dynamic and learning about the “rule of thirds” can help to create a balance aesthetically. Avoid Distractions. Be aware of things that might seem obtrusive later. Are there dirty dishes in the background while your child proudly shows off their new piece of art? Is someone on the move about to enter your frame? Editing things out is possible, but it is much easier to avoid them in the first place.
  Mix it up! Step back. Get closer. Turn the camera vertically. Move the lens and zoom in. Look at something from above. Get dirty. Be creative. Try a new angle. Make mistakes. You get the idea.
  6. Look for the Light If exposure is the brain and composition is the heart, light is the soul of a photo. Without light, photography wouldn’t exist. Always locate your light source(s) and identify its relationship to the subject. Some things to think about: If light is only behind your subject, it will become dark. Unless you desire a silhouette, which can be quite beautiful, find a way to get the subject back into the light or add another light source.
  Light can be harsh. Fluorescent light, flash and midday sunlight might wash things out or create undesired squints and shadows. Unless you are looking for that harsh light on purpose, you might need to move your subject a little farther away from that lamp or have them turn them slightly from the bright sun. Try shooting photos at the first and last light of day. It is truly astonishing. A quick note about flash. A quality speedlight is an amazing tool to have as a photographer. The one that came attached to your camera should stay closed or off most of the time. The best times to use flash are for portraiture as a soft, bounced fill in sort of light (indoors and outdoors), for special creative purposes and occasionally for that group shot of the family because you all happened to be together that night at the kinda dark restaurant. Natural light is amazing. Try to use it as much as possible. When you use light to its fullest potential, your photos will have more soul.
  7. Don’t Live only through the Lens This might seem contradictory to the tip about taking more photos, but I do not mean for it to be. This is something I have learned through personal experience on several occasions. I even blogged about the topic once, discussing the importance of capturing life rather than just a perfect shot. Don’t let your child take their first step and then fall to the floor instead of into your arms because you are holding the camera. Don’t forget to actually watch the sun set every once in a while. For most people, photography is a way of capturing a moment in time, but if you don’t actually awaken your senses and experience that moment, the photo will lack meaning in the future. By taking all of these tips into account, you will not only be able to take more photos you love, but you will be able to do it with less time and frustration and less to edit later. This frees you up to experience and love your beautifully documented life. That’s my perspective. *This work is licensed under a Creative Commons Attribution-NonCommercial-NoDerivs 3.0 Unported License.